All Ghost of Yotei Armor Sets: Locations, Stats, and Upgrades
Ghost of Yōtei Armor Guide | SteelSeries

Find every Ghost of Yōtei armor set: locations, perks, and upgrades for Onryō, Crimson Kimono, Dragonfly, and more to complete your collection.
Every good revenge tale deserves the right armor, and in Ghost of Yōtei, what you wear shapes how you fight, explore, and survive the frozen lands of Ezo. Each armor set unlocks a distinct playstyle, from the fearful Onryō Armor to the stealthy Crimson Kimono and the poison-laced Snake Skin Armor for Deluxe players.
No matter your goals for the game, we’re breaking down every armor set, where to find ‘em, and how to upgrade them, including dye locations, perks, and unique story unlocks.
Quick Tip: Most upgrades come from Ginji the Armorer, but some, like the Onryō and Ainu Robes, level up through story progression or collectibles. Always check your Wolf Pack menu for new upgrade prompts or dye unlocks after major missions.
Quick Reference: All Armor Sets in Ghost of Yōtei
Armor Set | Location / Quest | Perk Focus | Upgrade Method |
Onryō Armor | Starter gear | Fear & Wolf Summon | Story progression only — upgrades automatically by clearing Revenge Tale Cards (e.g., Shogun of the North, Kitsune’s Fate). |
Dragonfly Armor | “The Dragonfly Armor” – Tokachi Range | Archery damage & reload speed | Traditional upgrade path — pay Coin + Textiles + Wood + Rare Metals at Ginji the Armorer. |
Bounty Master Armor | “Soma the Condemned” – Yōtei Grasslands | Perfect Parry / Dodge | Traditional upgrade path — pay Coin + Textiles + Metals + Rare Metals at Ginji the Armorer. |
Robes for Sitturaynu | “The Heart of an Ainu” – Nayoro Wilds | Exploration & collectibles | Special upgrade path — collect Ainu Items across Ezo, then return them to Kaeka the Weaver (not Ginji). |
Taro’s Armor | Meet Taro the Scavenger | Defense & elemental resist | Traditional upgrade path — pay Coin + Textiles + Metals + Rare Metals at Ginji the Armorer. |
Armor of the Undying | “The Undying Samurai” – Ishikari Plain | Weapon alignment perks | Traditional upgrade path — pay Coin + Textiles + Oni Raider Mask Pieces + Rare Metals at Ginji the Armorer. |
Spider Lily Armor | “The Spider Lily General” – Tokachi Range | Stagger & melee AOE | Traditional upgrade path — pay Coin + Textiles + Metals + Rare Metals at Ginji the Armorer. |
Crimson Kimono | “The Crimson Kimono” – Teshio Ridge | Stealth & Kunai assassinations | Traditional upgrade path — pay Coin + Textiles + Shinobi Steel + Rare Metals at Ginji the Armorer. |
Mercenary Attire | “Belly of the Beast” – Ishikari Plain | Thrown weapons & Sake synergy | Traditional upgrade path — pay Coin + Textiles + Oni Raider Mask Pieces + Rare Metals at Ginji the Armorer. (Visual appearance does not change with upgrades.) |
Snake Skin Armor | Deluxe Edition unlock | Sake jars & poison clouds | No upgrades — static stats; received automatically after returning home post-purchase. |
Ginji’s Guard Armor | “Pride Before Tea” – Oshima Coast | Gunfire defense & reload speed | Traditional upgrade path — pay Coin + Textiles + Gun Parts + Rare Metals at Ginji the Armorer. |
Nine Tail Armor | “Blood on the Snow” – Teshio Ridge | Quickfire weapons & stealth | Traditional upgrade path — pay Coin + Textiles + Shinobi Steel + Rare Metals at Ginji the Armorer. |
Fundoshi | Bathe in all 16 Hot Springs | Silent sprinting | No upgrades — single-perk outfit unlocked via Hot Spring completion. |
All Armor Sets and Locations in Ghost of Yōtei
There are twelve armor sets to find across Ezo, some hidden behind Mythic Tales, others tied to bounty contracts, and a few that appear naturally as the story unfolds. Each one not only changes your stats and perks, but also how you move through the world: the Robes for Sitturaynu help you uncover collectibles, while the Crimson Kimono turns you into a silent assassin.
If you’re chasing 100% completion (or that shiny For All Occasions trophy), you’ll need to track down every piece of gear and its dyes. Below, you’ll find the exact quest or region, the perks each armor specializes in, and the best use cases for your playstyle.
Onryō Armor: How to Get It & Upgrade Guide
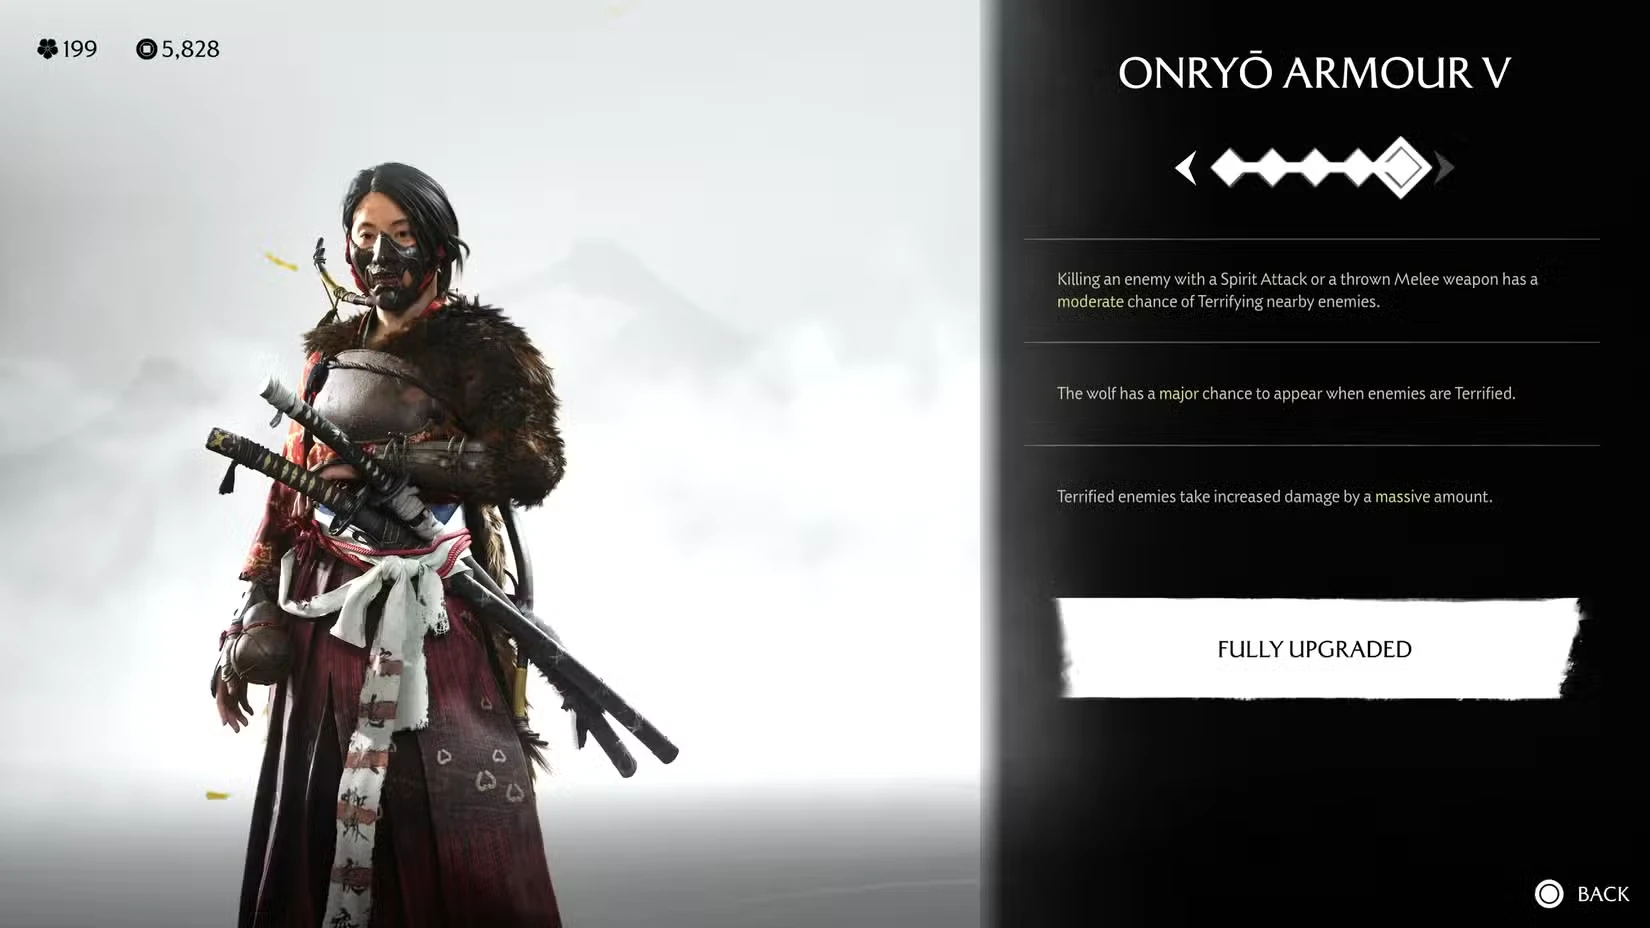
The Onryō Armor is the very first set you’ll equip in Ghost of Yōtei — and it perfectly captures Atsu’s haunted, vengeance-driven playstyle. While it looks like a simple starter outfit, don’t be fooled: it’s one of the few sets that evolves directly through story progression, gaining power as you complete Revenge Tale quests tied to the Yōtei Six.
How to Get the Onryō Armor:
You start the game wearing it automatically. Unlike other armor sets, you won’t find it in the open world or earn it from a Tale quest. Instead, its upgrades are directly tied to Atsu’s main story of vengeance.
To improve the armor, follow the Gold Ginkgo Leaf icons on your map. Each one marks a Revenge Tale Card quest. Completing these missions gradually unlocks new tiers of the armor.
Revenge quests that upgrade Onryō Armor:
Shogun of the North
The Tale of the Oni
The Kitsune’s Fate
To Catch a Spider
Upgrade Method: You cannot upgrade this armor at Ginji’s forge. Instead, its rank automatically increases as you complete the above Revenge quests. Each rank strengthens the armor’s “Terror” and “Wolf Summon” mechanics.
Level | How to Unlock | Perk Improvements |
II | Clear 1 Revenge Tale | Unlocks its 3 core perks (see below) |
III | Clear 2 Revenge Tales | Spirit or thrown melee kills have a moderate chance to terrify enemies |
IV | Clear 3 Revenge Tales | Wolf has a major chance to appear when enemies are terrified |
V | Complete To Catch a Spider | Terrified enemies take massive extra damage |
Core Perks:
Perk | Effect |
Terror Surge | Killing an enemy with a Spirit Attack or thrown melee weapon can Terrify nearby foes. |
Call of the Wolf | The Wolf has a chance to appear when enemies are terrified. |
Echo of Fear | Terrified enemies take increased damage. |
Pro Tip: Don’t ditch your starter armor too soon. Once you hit Onryō Armor III or higher, its Terror chain effect becomes a crowd-control powerhouse — perfect for clearing bandit camps or Oni ambushes without ever breaking your combo.
Dragonfly Armor: How to Get It & Upgrade Guide
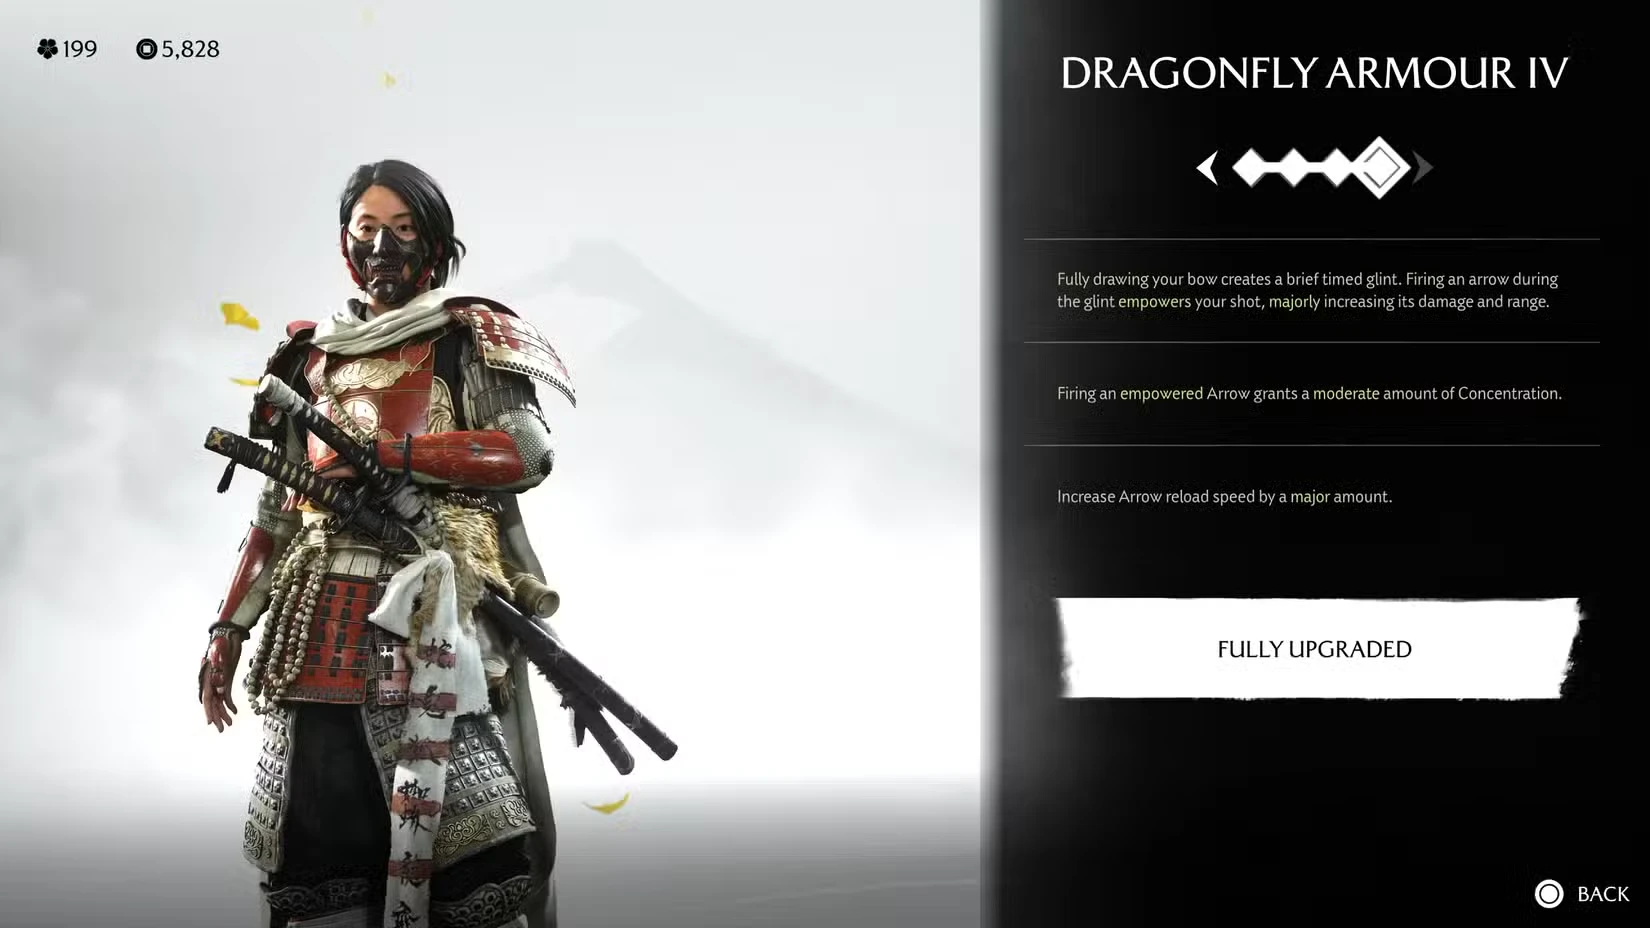
If your playstyle leans toward precision and patience, the Dragonfly Armor is your best early-game pick. Designed for archers and long-range fighters, it boosts arrow damage, range, and reload speed, making every shot feel smoother and deadlier.
How to Get the Dragonfly Armor:
You’ll earn this set by completing the Tale quest “The Dragonfly Armor.”
Quest giver: Daijiro at Cairn Forks in the Tokachi Range.
Quest location: South of Ohara Plains, near the river crossing.
After meeting Daijiro and finishing his questline, which involves rescuing him from bounty hunters, you’ll automatically receive the armor as your reward.
Upgrade Method: The Dragonfly Armor follows a traditional upgrade path at Ginji the Armorer. Each tier enhances your archery capabilities, improving both damage and Concentration gain.
Level | Cost | Perk Improvements |
II | 650 Coin | Empowered shots deal majorly increased damage and range. |
III | 1,100 Coin + 10 Textiles + 50 Wood | Empowered shots grant moderate Concentration on hit. |
IV | 2,000 Coin + 20 Textiles + 10 Rare Metals | Arrow reload speed increased by a major amount. |
Core Perks:
Perk | Effect |
Dragonfly’s Aim | Fully drawing your bow creates a brief timed glint; firing during it boosts arrow damage and range. |
Focused Breath | Hitting with empowered arrows restores a bit of Concentration, letting you slow time more often. |
Swift Draw | Arrows reload faster, making long fights and crowd engagements smoother. |
Pro Tip: The glint timing window from Dragonfly’s Aim is short but powerful, practice it on bandit patrols to master “perfect shots.” Combine this set with a Longbow or Spirit Bow for maximum burst damage in boss encounters.
Bounty Master Armor: How to Get It & Upgrade Guide
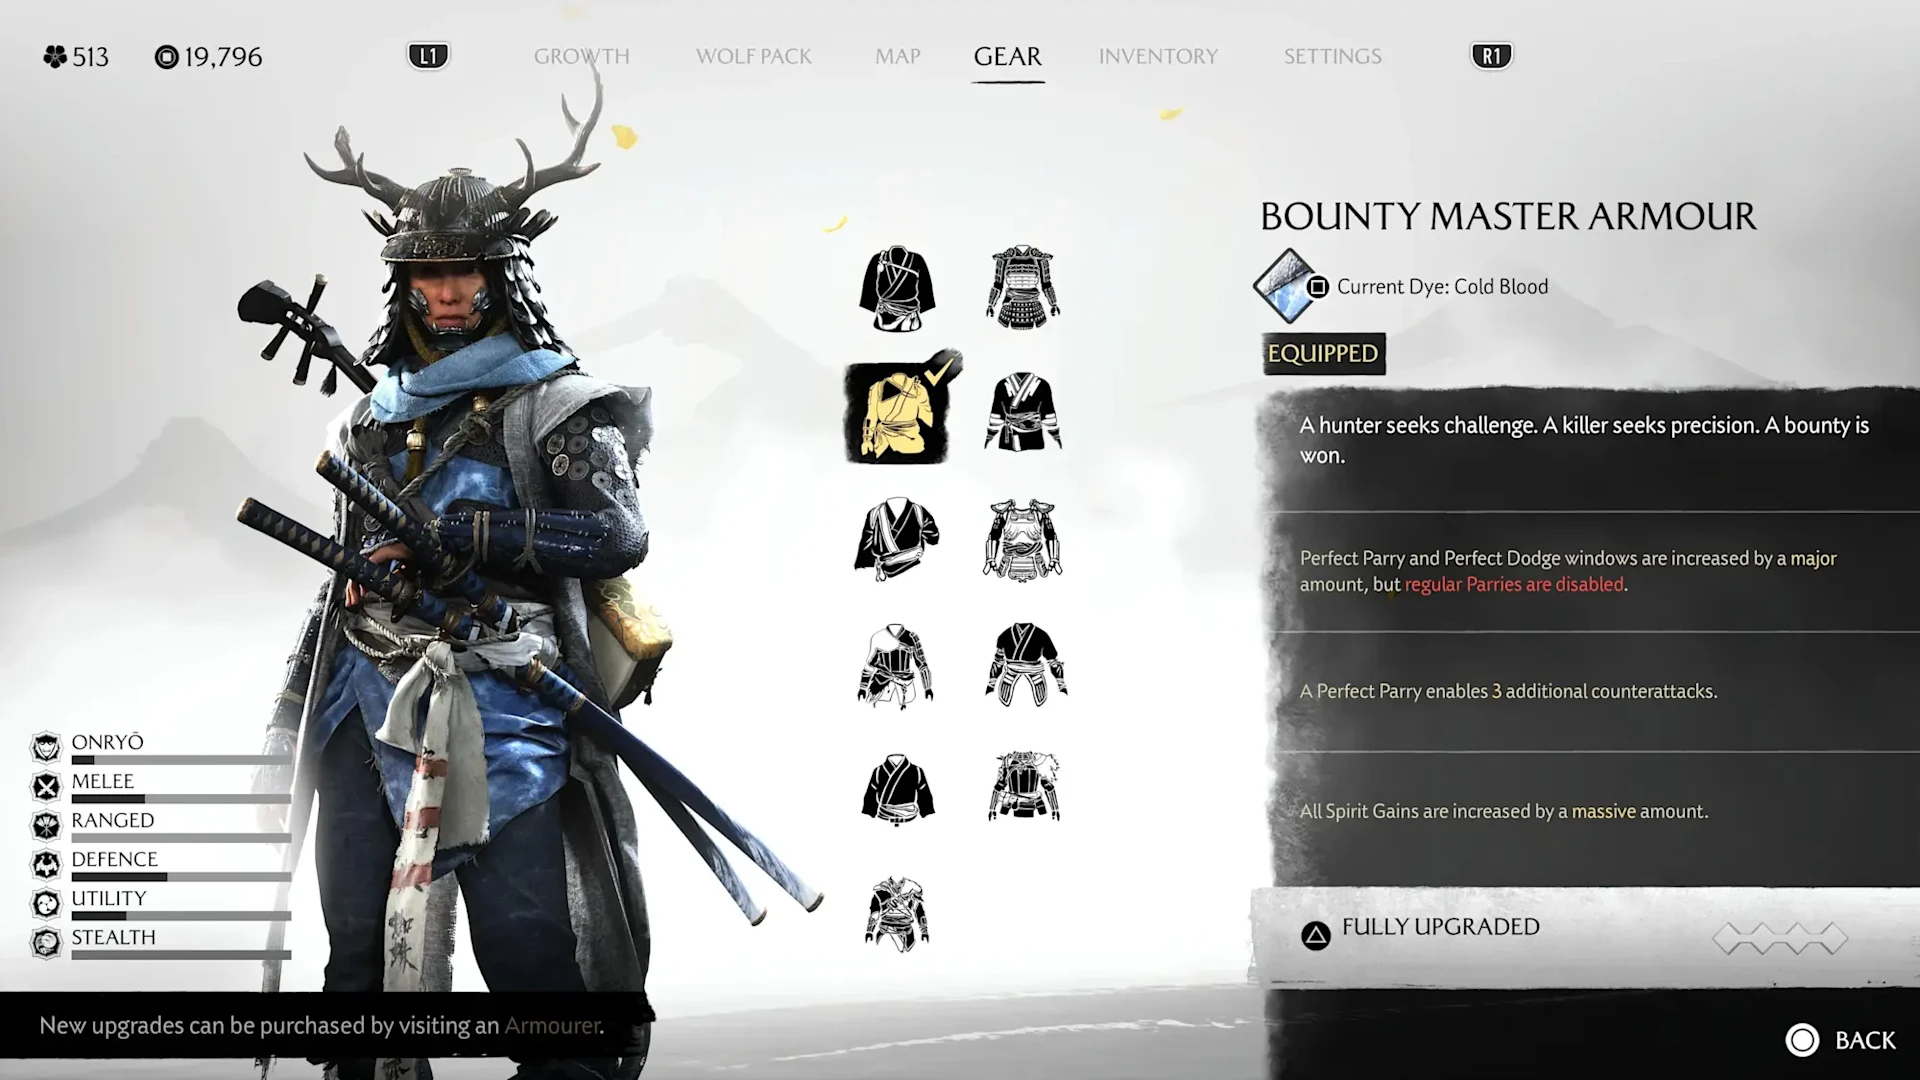
The Bounty Master Armor is made for players who live for the perfect parry. This high-risk, high-reward set enhances your timing-based skills, expanding Perfect Parry and Dodge windows while rewarding precision with extra counterattacks and Spirit gain.
Chasing perfect parries? Map your dodge/parry to a preferred key on Engine (in GG) and set a custom actuation on Apex keyboards for faster response.
How to Get the Bounty Master Armor:
You’ll unlock this armor by completing the bounty quest “Soma the Condemned” in the Yōtei Grasslands.
The bounty becomes available after completing “Bonecrusher.”
To start it, visit any Bounty Board and talk to Kojiro, who will send you to hunt Soma near Lake Jozan (northwest Grasslands).
Complete the duel and turn in the bounty to receive the armor.
Upgrade Method: The Bounty Master Armor upgrades through Ginji the Armorer, using the standard Coin + materials route. Each level widens your Perfect Parry and Dodge windows, increases Spirit gain, and eventually unlocks triple counterattacks.
Level | Cost | Perk Improvements |
II | 650 Coin | Perfect Parry and Dodge windows increased by a major amount. |
III | 1,100 Coin + 10 Textiles + 25 Metals | Spirit gain from combat increased by a massive amount. |
IV | 2,000 Coin + 20 Textiles + 10 Rare Metals | Perfect Parries trigger three counterattacks instead of two. |
Core Perks:
Perk | Effect |
Calculated Defense | Perfect Parry and Perfect Dodge windows slightly increased — but regular Parries are disabled. |
Hunter’s Reflex | A Perfect Parry grants two counterattacks. |
Spirit Surge | All Spirit gains are boosted, fueling your special moves faster. |
Pro Tip: The Bounty Master set is risky early on but shines after upgrading once. That first upgrade widens your Perfect window enough to make it reliable, especially in duels or boss fights where one mistake can ruin a streak. Pair it with Spirit charms to stay aggressive without breaking focus.
Robes for Sitturaynu: How to Get It & Upgrade Guide
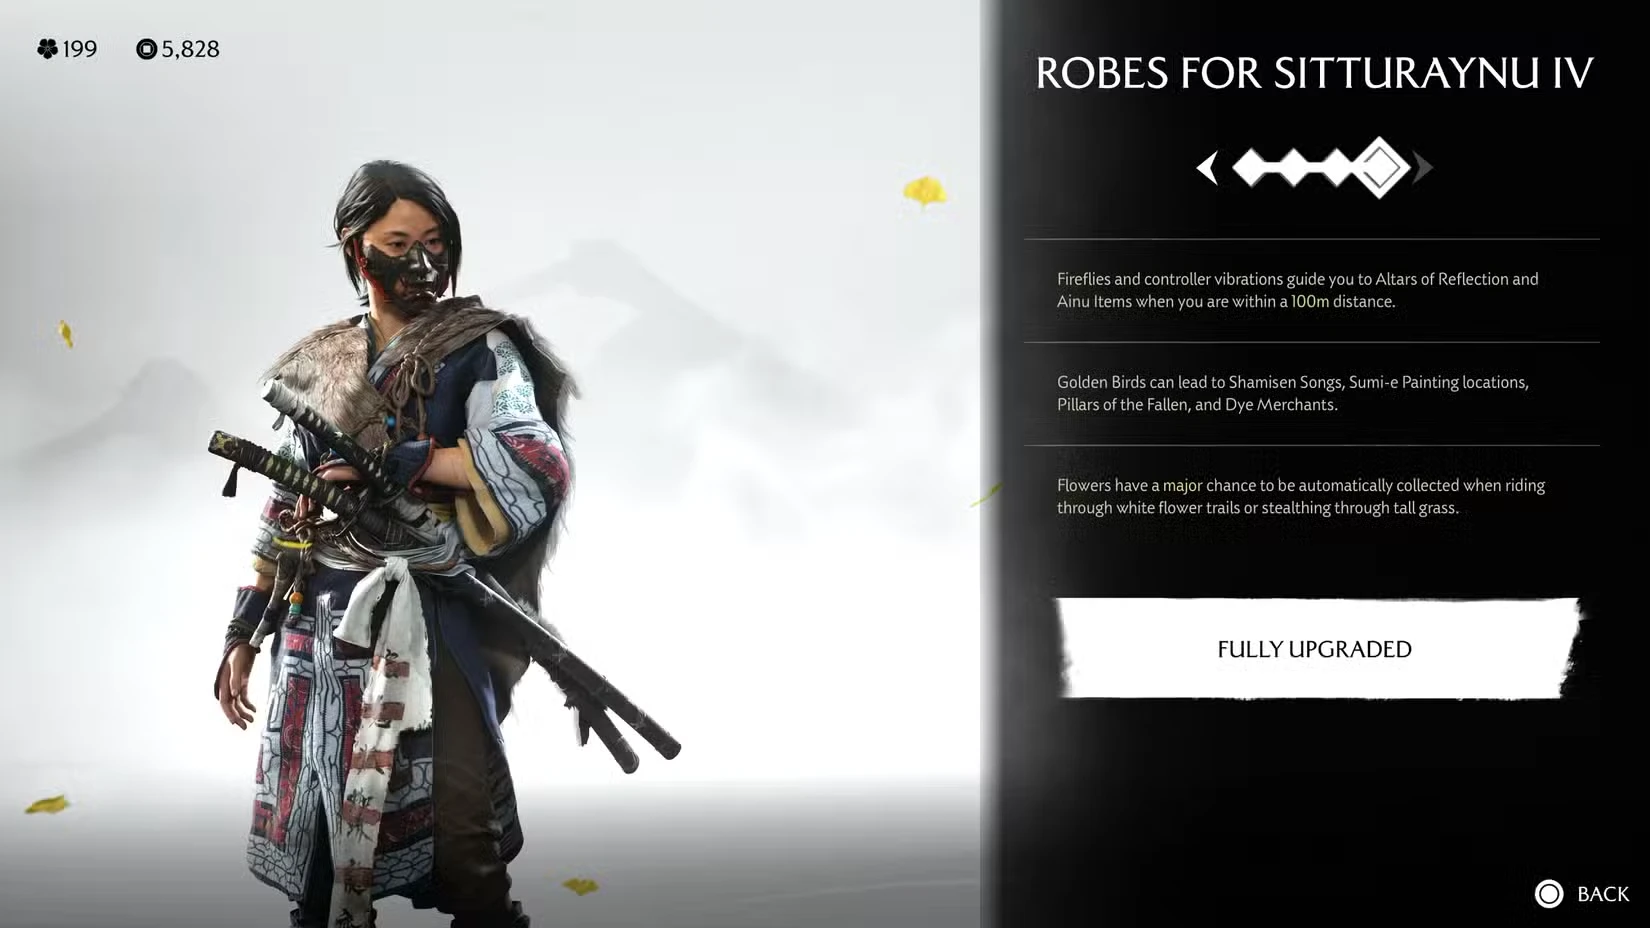
If you love exploration and secrets, instead of nonstop combat, the Robes for Sitturaynu are made for you. Instead of boosting combat stats, this set rewards curiosity, helping you uncover collectibles, hidden shrines, and cultural artifacts across Ezo. It’s a must-have for players chasing 100% completion or the For All Occasions trophy.
How to Get the Robes for Sitturaynu:
Start the Tale quest “The Heart of an Ainu” in the Nayoro Wilds, north of Tokachi Range.
You’ll meet Huci, an Ainu woman seeking to guide a lost hunter.
Follow the questline through Husko Kotan Village in the Iwor Mountains, and complete it to earn the robes.
Once unlocked, the Robes for Sitturaynu automatically enhance your ability to locate hidden objects across the map.
Upgrade Method: These robes don’t use Coin or materials. Instead, they evolve through exploration, by collecting Ainu Items scattered across Ezo and returning them to Kaeka the Weaver in Husko Kotan.
Each upgrade expands the robes’ sensory range and auto-collection perks.
Level | Requirement | Perk Improvements |
II | Collect 5 Ainu Items | Fireflies and controller vibrations now guide you to Altars of Reflection and Ainu Items within a 100m radius. |
III | Collect 10 Ainu Items | Golden Birds can now lead to Shamisen Songs, Sumi-e Paintings, Pillars of the Fallen, and Dye Merchants. |
IV | Collect 15 Ainu Items | Flowers have a major chance to auto-collect when riding through trails or stealthing through tall grass. |
Core Perks:
Perk | Effect |
Guiding Light | Fireflies and controller vibrations lead you to Altars of Reflection nearby. |
Song of Discovery | Golden Birds can guide you to new collectible types like Shamisen Songs and Sumi-e Paintings. |
Nature’s Favor | Flowers auto-collect when moving through white flower trails or tall grass. |
Pro Tip: Pair these robes with the Song of the Ainu on your Shamisen to guide the wind toward nearby Ainu Items. It’s the fastest way to max out the set and you’ll naturally uncover side quests and hidden merchants along the way.
Taro’s Armor: How to Get It & Upgrade Guide
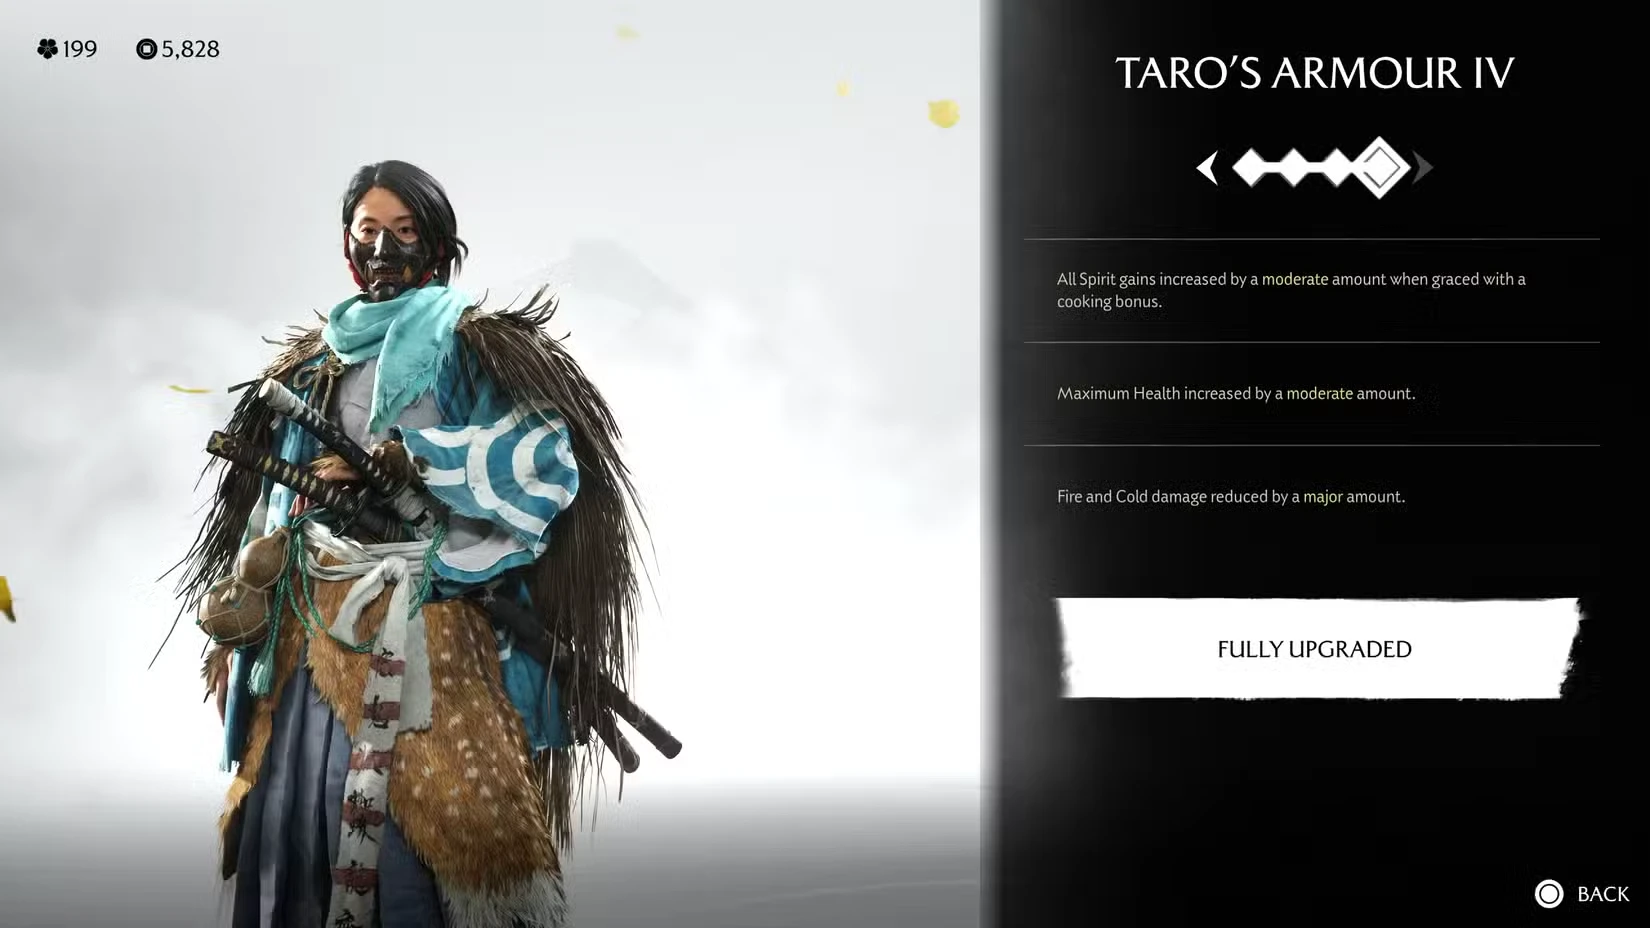
Taro the Scavenger is a wandering survivor with a knack for turning battlefield scraps into lifesaving gear. The armor he gifts you isn’t flashy, but it’s one of the most reliable, all-around defensive sets in Ghost of Yōtei. It keeps you standing through tough boss fights and elemental zones, making it an essential mid-game pickup.
How to Get Taro’s Armor:
You can obtain Taro’s Armor early on by encountering Taro the Scavenger at Dead Man’s Tree in the Tokachi Range.
You’ll spot the event marked by a white flag painted with a conical hat.
Step in as two bandits harass Taro for looting the dead; after you intervene and defuse the situation, he thanks Atsu by gifting her his armor.
Taro can also appear in random encounters across Ezo, but Dead Man’s Tree is a guaranteed location.
Upgrade Method: Like most gear, Taro’s Armor upgrades through Ginji the Armorer. Each rank improves your survivability and environmental resistance, giving you a strong edge in snowy or fiery regions.
Level | Cost | Perk Improvements |
II | 650 Coin | Spirit gains increased by a moderate amount when you have a cooking bonus active. |
III | 1,100 Coin + 10 Textiles + 25 Metals | Max Health increased by a moderate amount. |
IV | 2,000 Coin + 20 Textiles + 10 Rare Metals | Fire and Cold damage reduced by a major amount. |
Core Perks:
Perk | Effect |
Survivor’s Resolve | Spirit gain increases slightly after eating cooked meals. |
Enduring Soul | Increases maximum health by a minor amount. |
Elemental Guard | Reduces Fire and Cold damage taken by a moderate amount. |
Pro Tip: Cook before big fights. The Spirit bonus from Survivor’s Resolve stacks beautifully with Taro’s Armor’s defensive perks, making healing and Spirit Attacks more efficient. It’s a great fallback set when tackling Oni-heavy or weather-affected regions.
Armor of the Undying: How to Get It & Upgrade Guide
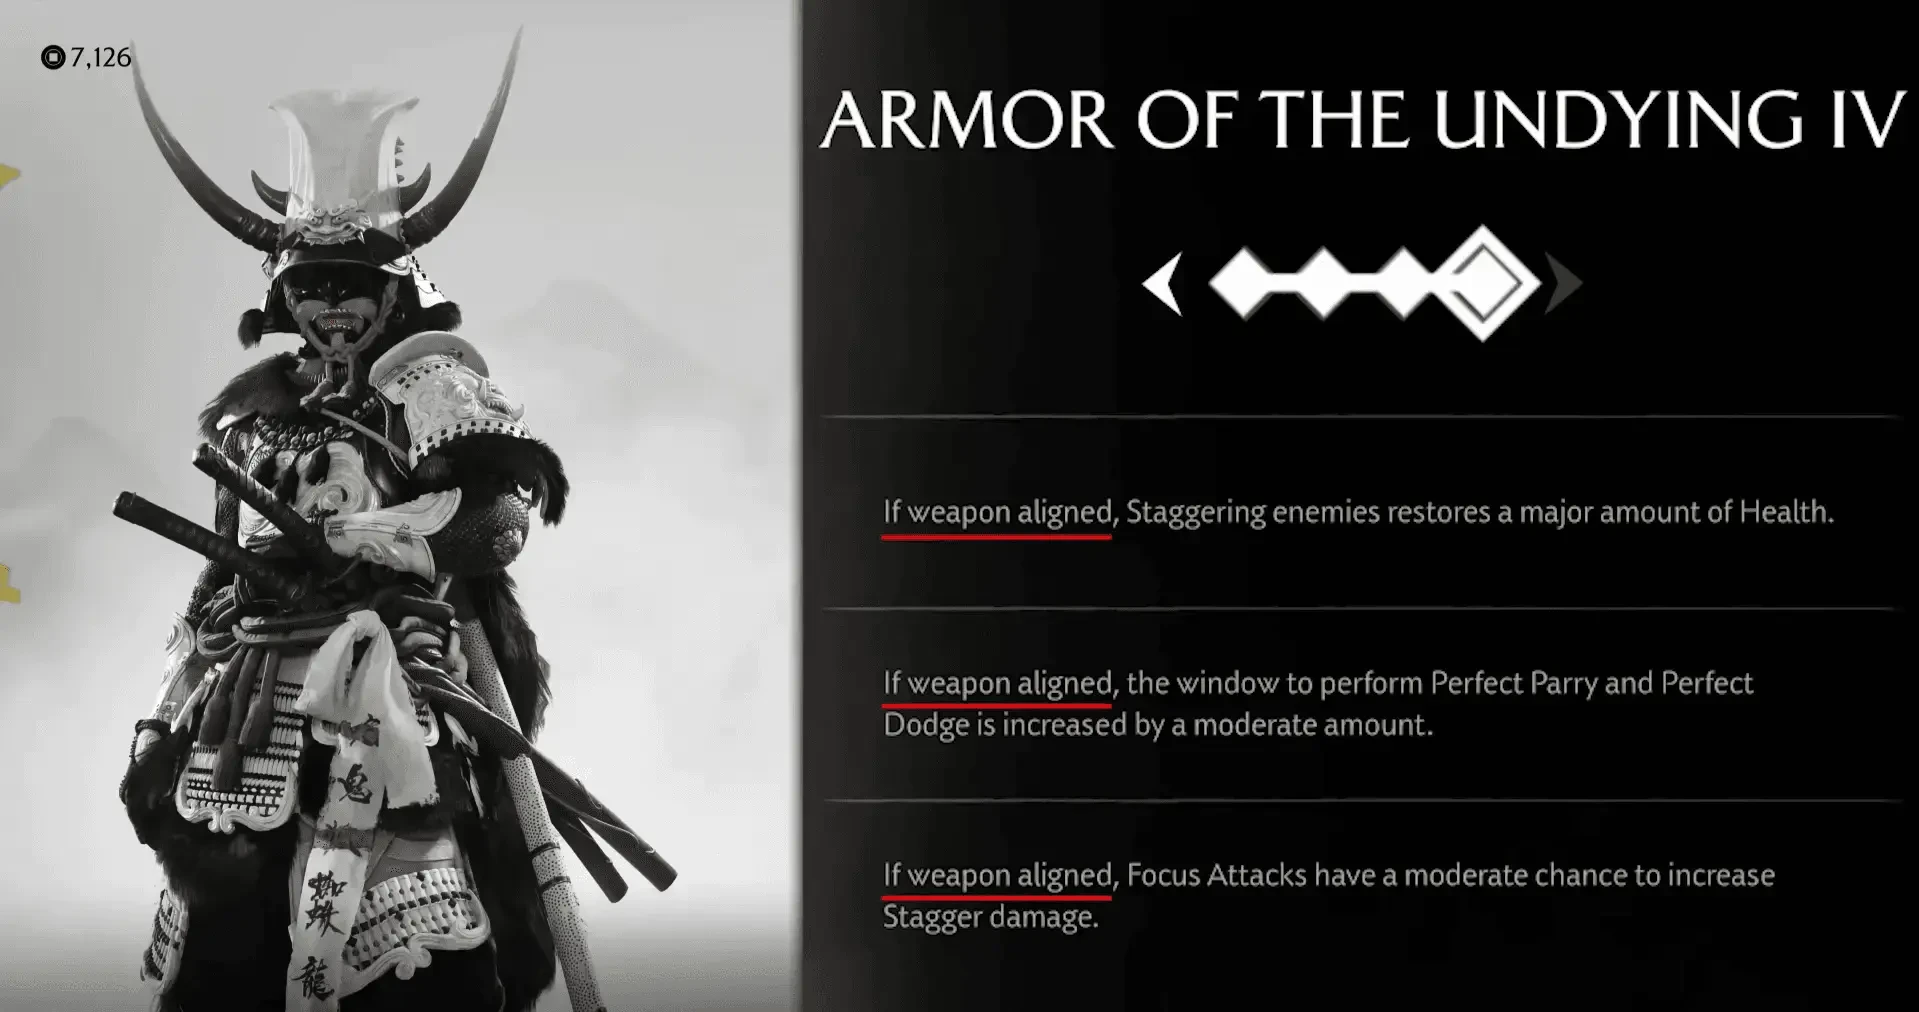
The Armor of the Undying is a mythic set steeped in curse and legend. The lore is that it belonged to a samurai who cheated death itself. This armor rewards precision and patience, granting healing and defensive buffs when you’re “weapon-aligned”, that is, using the correct weapon type to counter an enemy’s fighting style. If you thrive on Perfect Parries and reading your opponents, this is the set for you.
How to Get the Armor of the Undying:
You’ll earn this armor by completing the Mythic Tale “The Undying Samurai.”
Starting point: Speak with Ugetsu the Storyteller at Storyteller’s Rest in the Ishikari Plain, northwest of Nagoya Spring.
The tale involves tracking down wind chimes scattered around the region, each one leading you closer to the cursed warrior.
Completing the quest and defeating the Undying Samurai rewards you with the armor.
Upgrade Method: The Armor of the Undying upgrades through Ginji the Armorer, using a mix of Coin, Textiles, and rare materials obtained from Oni enemies. Each upgrade deepens its “weapon alignment” bonuses, improving your sustain and timing tools in combat.
Level | Cost | Perk Improvements |
II | 650 Coin | Staggering enemies while weapon-aligned restores more health. |
III | 1,100 Coin + 10 Textiles + 30 Oni Raider Mask Pieces | Perfect Parry / Dodge windows extended by a moderate amount. |
IV | 2,000 Coin + 20 Textiles + 10 Rare Metals | Focus Attacks have a moderate chance to increase stagger damage when weapon-aligned. |
Core Perks:
Perk | Effect |
Death Denied | While weapon-aligned, staggering enemies restores health. |
Fated Reflex | While weapon-aligned, the Perfect Parry and Dodge windows are slightly larger. |
Unbroken Focus | Focus Attacks can increase stagger damage, rewarding measured play. |
Pro Move: This armor shines in duels and boss fights. Learn each enemy’s weapon type, swapping between your Dual Katana, Yari, or Sickle mid-combat can trigger alignment bonuses and keep you alive far longer than raw defense ever could.
Spider Lily Armor: How to Get It & Upgrade Guide
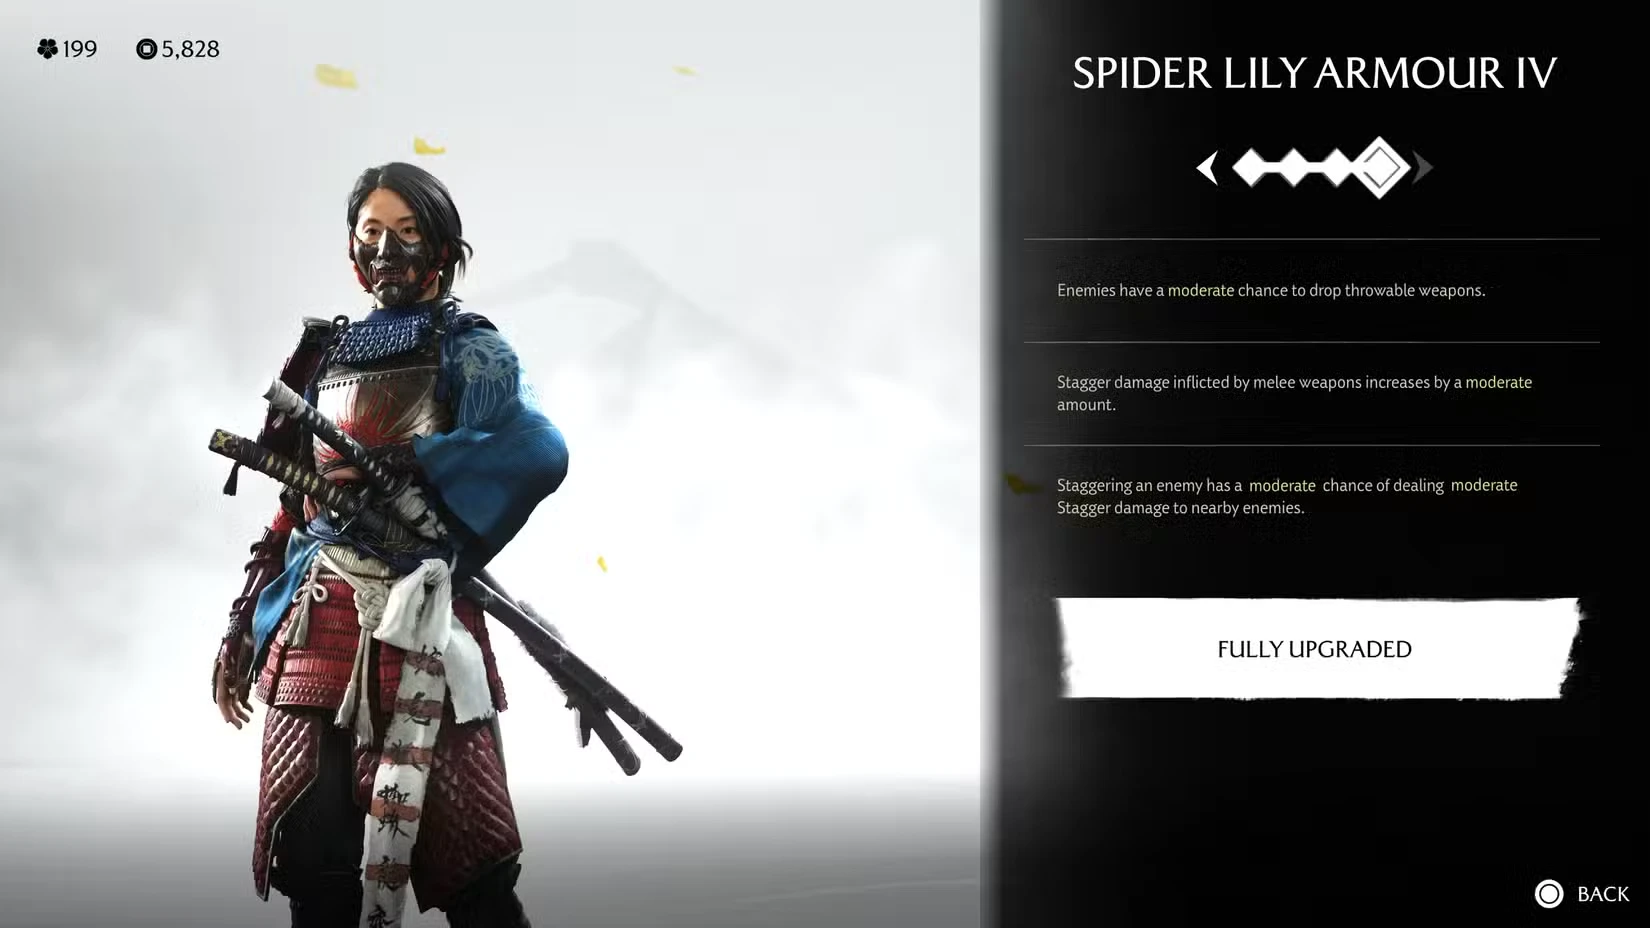
The Spider Lily Armor is a reward for those who embrace chaos. Once worn by a grief-stricken general, this set amplifies stagger damage, boosts your throwable weapon drops, and even lets you spread stagger effects to nearby enemies. It’s one of the strongest crowd-control armors in Ghost of Yōtei.
How to Get the Spider Lily Armor:
You’ll unlock this set by completing the Mythic Tale “The Spider Lily General” in the Tokachi Range.
Start at the Mysterious Gate located south of Shizunai Woods and east of Yamane Bluffs.
Follow the mythic questline to the Abandoned Tominaga Estate, where you’ll face the Spider Lily General himself.
Defeat him and claim the armor from his resting place at the end of the mission.
Upgrade Method: The Spider Lily Armor uses a traditional upgrade path through Ginji the Armorer, fueled by Coin, Textiles, and metal resources. Each rank expands its area-of-effect potential and makes throwable combat far more rewarding.
Level | Cost | Perk Improvements |
II | 650 Coin | Enemies have a moderate chance to drop throwable weapons. |
III | 1,100 Coin + 10 Textiles + 25 Metals | Stagger damage inflicted by melee weapons increased by a moderate amount. |
IV | 2,000 Coin + 20 Textiles + 10 Rare Metals | Staggering an enemy can deal moderate stagger damage to nearby enemies. |
Core Perks:
Perk | Effect |
Fallen Bloom | Enemies have a small chance to drop throwable weapons when defeated. |
Petals of Pain | Increases stagger damage dealt by melee attacks. |
Grief’s Wave | Staggering one enemy can chain stagger effects to nearby foes. |
Pro Move: The Spider Lily Armor turns the battlefield into your playground. Use stagger-heavy weapons like the Tetsubo or Dual Katanas to chain knockdowns, then follow up with thrown weapons to finish enemies before they recover.
Crimson Kimono: How to Get It & Upgrade Guide
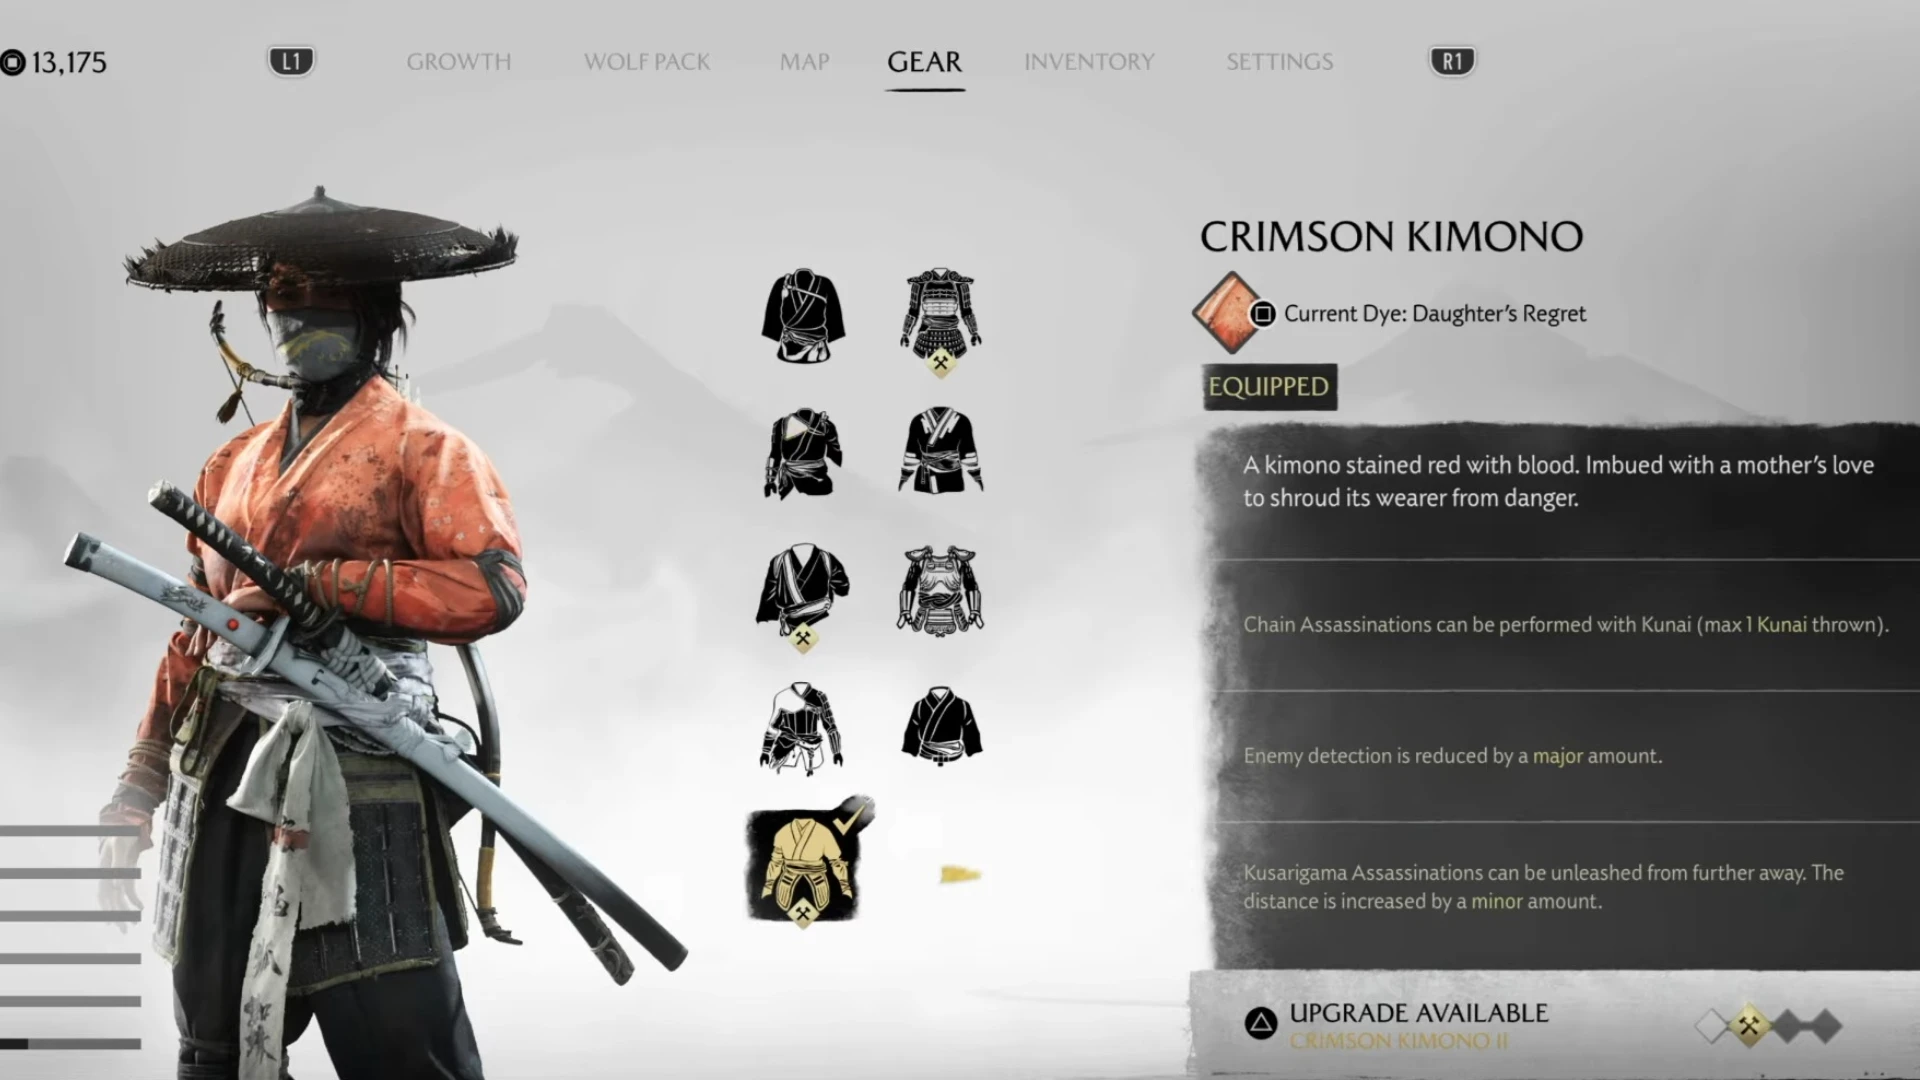
The Crimson Kimono is Ghost of Yōtei’s ultimate stealth armor, elegant, deadly, and built for players who prefer to end fights before they start. With perks that enhance assassination range, reduce detection, and even allow Kunai-based chain kills, this set is a favorite for infiltrators and completionists.
How to Get the Crimson Kimono:
Start the Mythic Tale “The Crimson Kimono” in the Teshio Ridge region.
Look for three Sun-Painted Trees (bright orange with red fireflies): one in Sakuru Woods, another near Hakodake Mountain, and one northwest of the Teshio River.
Interacting with each tree triggers a trail of glowing fireflies leading you toward the Old Home.
Complete the snow sculpture sequence and follow the fireflies to a nearby grave — that’s where you’ll find the Crimson Kimono.
Upgrade Method: You can upgrade the Crimson Kimono through Ginji the Armorer using Coin, Textiles, Shinobi Steel, and Rare Metals. Each tier expands your assassination reach and stealth efficiency, transforming you into a true ghost of the battlefield.
Level | Cost | Perk Improvements |
II | 650 Coin | Chain Assassinations can be performed with two Kunai instead of one. |
III | 1,100 Coin + 10 Textiles + 30 Shinobi Steel | Enemy detection reduced by a massive amount. |
IV | 2,000 Coin + 20 Textiles + 10 Rare Metals | Kusarigama Assassinations can be unleashed from a majorly increased distance. |
Core Perks:
Perk | Effect |
Silent Bloom | Enables Chain Assassinations using Kunai (max 1 Kunai at base). |
Veil of Crimson | Greatly reduces enemy detection range. |
Shadow’s Reach | Increases Kusarigama Assassination distance. |
Pro Tip: Combine the Crimson Kimono with stealth charms that boost Quickfire or Silent Kill efficiency. The Kunai chain perk lets you clear two or three enemies in seconds, and if you’ve unlocked the Killer’s Instinct ability, you’ll know exactly who can be killed without breaking cover.
Mercenary Attire: How to Get It & Upgrade Guide
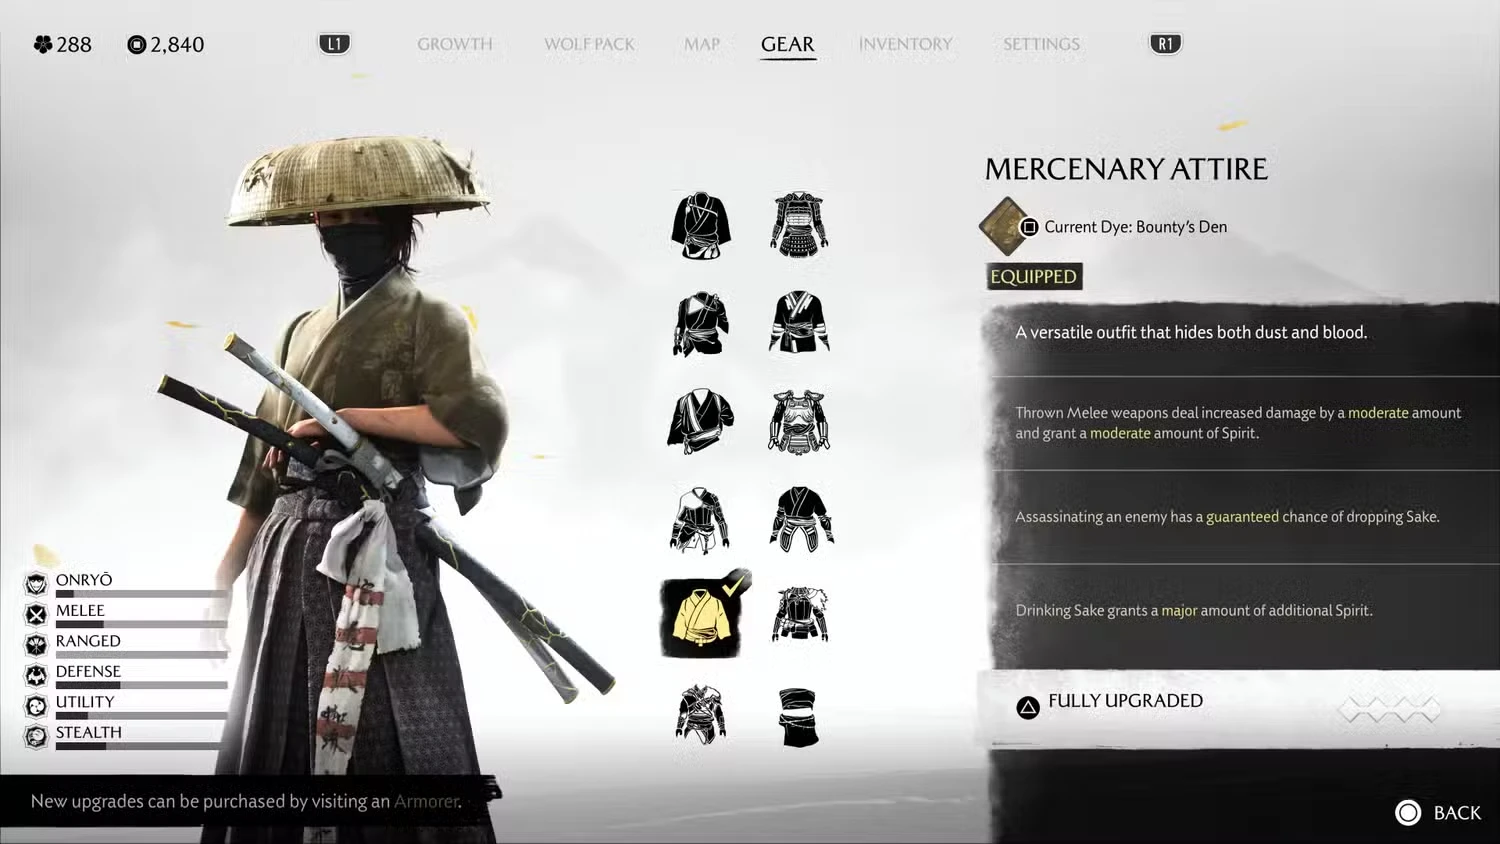
Part brawler, part trickster, the Mercenary Attire is Ghost of Yōtei’s most versatile armor, built for players who mix stealth, melee, and utility. It rewards aggression and improvisation, letting you turn Sake into Spirit fuel while dishing out boosted thrown-weapon damage.
How to Get the Mercenary Attire:
You’ll automatically acquire the Mercenary Attire at the start of the Revenge quest “Belly of the Beast” in the Ishikari Plain.
This mission is part of Atsu’s main storyline and can’t be missed.
Once equipped, you’ll keep the armor permanently after completing the quest, making it one of the most accessible mid-game sets.
Upgrade Method: The Mercenary Attire upgrades through Ginji the Armorer, using Coin, Textiles, and Oni Raider Mask Pieces. Its upgrades enhance Spirit gain, damage from thrown melee weapons, and Sake-related bonuses.
Level | Cost | Perk Improvements |
II | 650 Coin | Thrown melee weapons deal moderate extra damage and grant moderate Spirit on hit. |
III | 1,100 Coin + 10 Textiles + 30 Oni Raider Mask Pieces | Assassinations guarantee a Sake drop. |
IV | 2,000 Coin + 20 Textiles + 10 Rare Metals | Drinking Sake grants a major amount of additional Spirit. |
Core Perks:
Perk | Effect |
Brawler’s Instinct | Thrown melee weapons deal more damage and restore Spirit. |
Liquid Luck | Assassinations may cause enemies to drop Sake. |
Drunken Spirit | Drinking Sake grants a burst of Spirit energy. |
Pro Tip: Use Sake offensively. Toss one mid-fight to bait enemies, then drink another to trigger Drunken Spirit and fire off special attacks. Just don’t overdo it, three gulps too many, and Atsu might start puking mid-battle.
Snake Skin Armor: How to Get It & Perk Guide
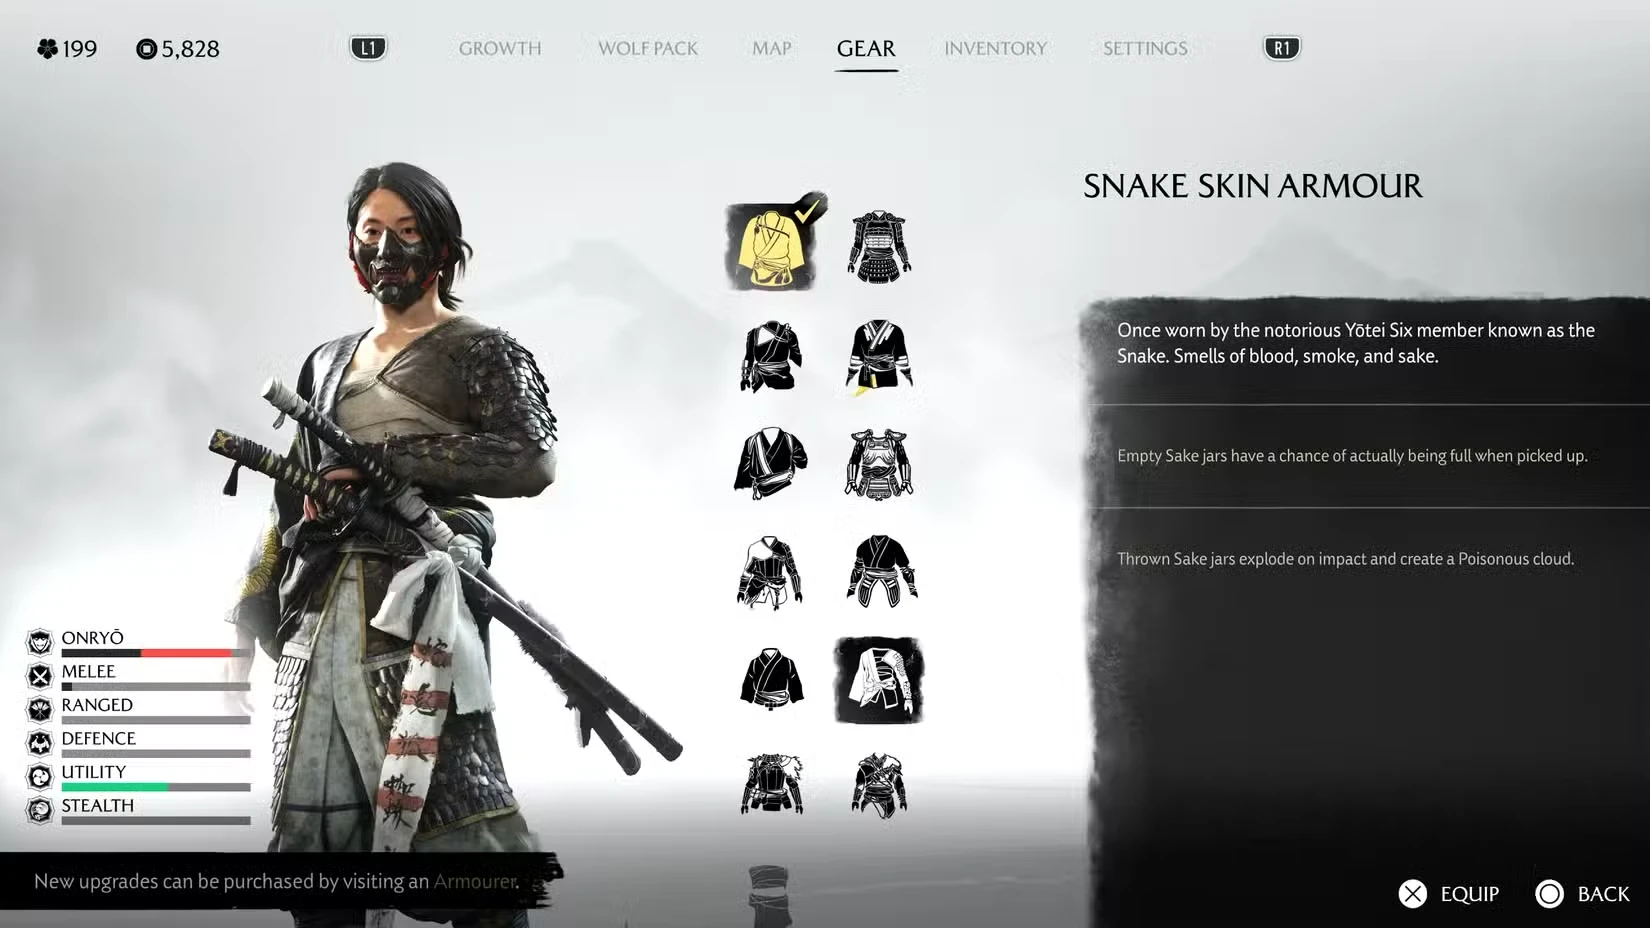
If you grabbed the Deluxe Edition of Ghost of Yōtei, you get a head start on style and strategy. The Snake Skin Armor once belonged to a member of the Yōtei Six known simply as The Snake and fittingly, it turns your Sake jars into weapons of opportunity. Think of it as the trickster’s toolkit: subtle, toxic, and a little bit smug.
How to Get the Snake Skin Armor:
The Snake Skin Armor is exclusive to the Deluxe Edition of Ghost of Yōtei.
If you purchased the base game, upgrading to the Deluxe Edition via the PlayStation Store adds this armor (along with other cosmetics).
Once the content is installed, you’ll receive the set automatically after Atsu returns home for the first time in the main story.
Upgrade Method: This armor cannot be upgraded, it’s a static set with two unique passive abilities designed around Sake jars and poison effects.
Core Perks:
Perk | Effect |
Venomous Brew | Empty Sake jars have a chance to actually be full when picked up. |
Toxic Trick | Thrown Sake jars explode on impact, creating a poison cloud that damages and disorients enemies. |
Pro Tip: The Snake Skin Armor pairs beautifully with Mercenary Attire or Crimson Kimono playstyles, alternate between stealth kills and poison chaos to wipe out whole camps before they even reach you.
Ginji’s Guard Armor: How to Get It & Upgrade Guide
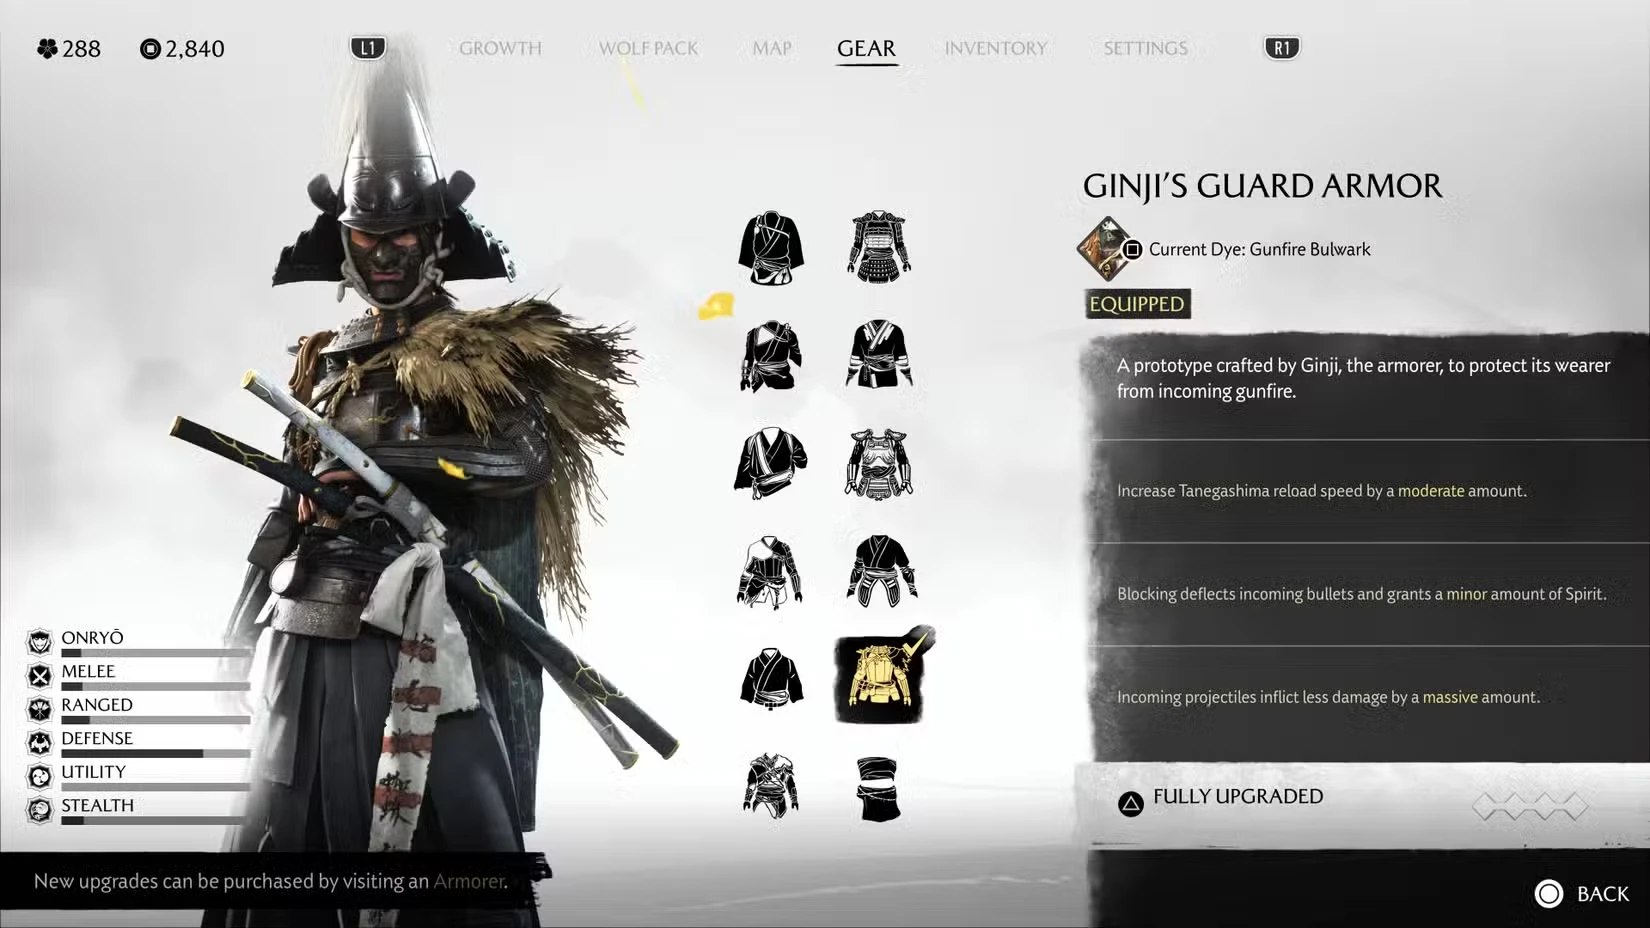
The Ginji’s Guard Armor is a late-game reward for players who love turning enemy fire back on their foes. Crafted by Ginji the Armorer himself, this prototype was designed to counter the growing use of Tanegashima matchlocks in the region, giving Atsu one of the strongest defensive toolkits in Ghost of Yōtei.
How to Get the Ginji’s Guard Armor:
You’ll earn this set by completing the Tale “Pride Before Tea” in the Oshima Coast region.
The quest can be triggered by encountering Ginji along the Oyobe River, southwest of Matsumae Castle.
Complete his storyline, which revolves around testing his experimental armor, to receive the final blueprint and the full Ginji’s Guard set.
Upgrade Method: Like most late-game gear, the Ginji’s Guard Armor upgrades through Ginji the Armorer himself (naturally). Each tier boosts bullet resistance, reload speed, and Spirit generation when deflecting shots, essential for ranged-heavy encounters.
Level | Cost | Perk Improvements |
II | 650 Coin | Tanegashima reload speed increased by a moderate amount. |
III | 1,100 Coin + 10 Textiles + 20 Gun Parts | Blocking bullets now deflects them and grants minor Spirit. |
IV | 2,000 Coin + 20 Textiles + 10 Rare Metals | Incoming projectiles inflict massively reduced damage. |
Core Perks:
Perk | Effect |
Lockstep Reload | Increases Tanegashima reload speed. |
Lead Reversal | Blocking deflects bullets and grants Spirit. |
Steel Hide | Reduces all projectile damage taken by a major amount. |
Pro Tip: The Ginji’s Guard Armor is a lifesaver in later areas packed with riflemen or Oni gunners. Pair it with the Armor of the Undying for back-to-back Perfect Parry and bullet deflect synergy.
Nine Tail Armor: How to Get It & Upgrade Guide
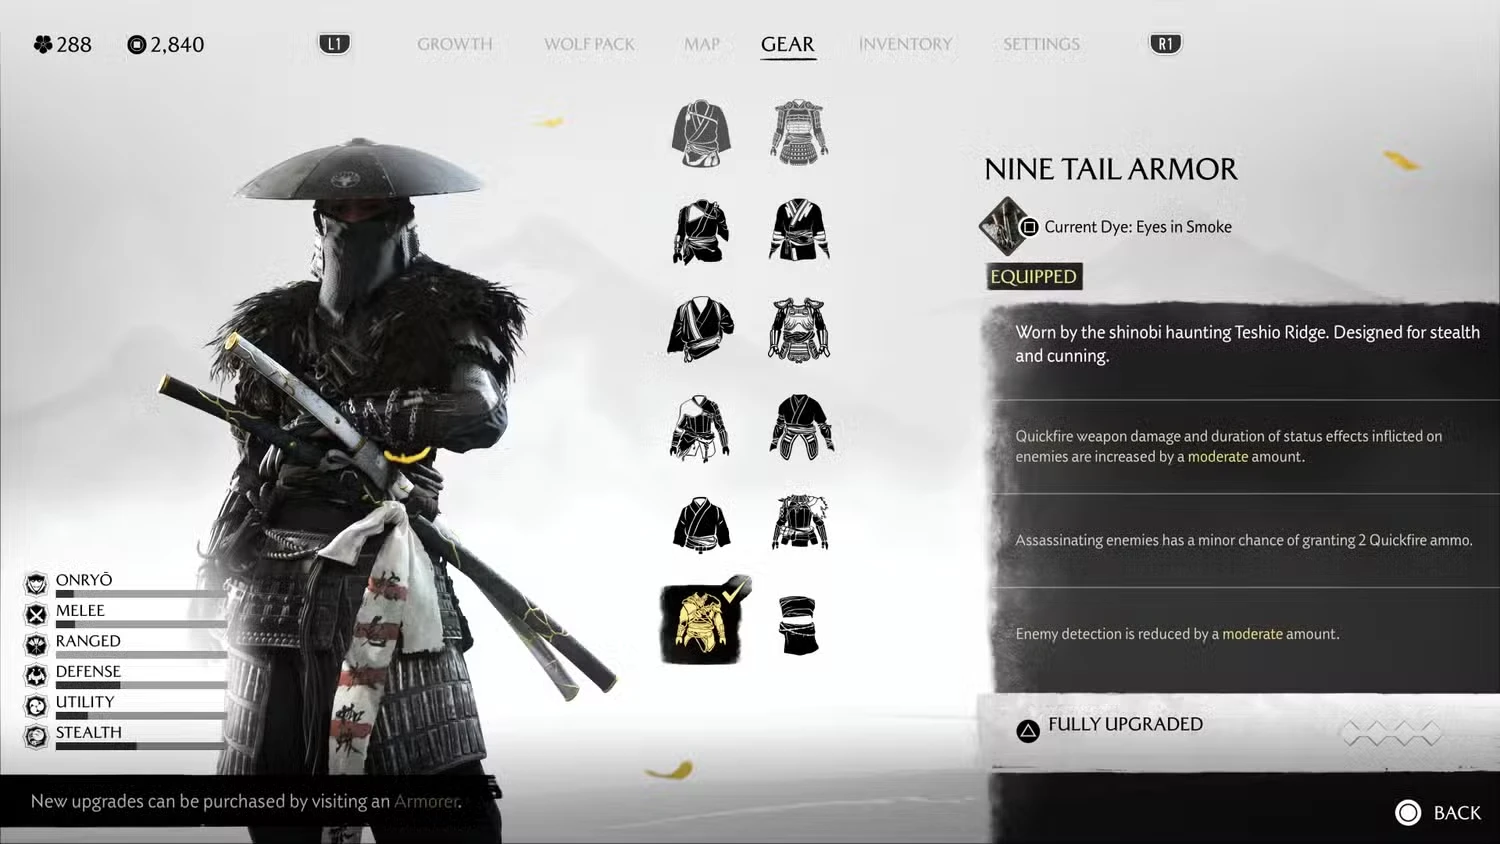
The Nine Tail Armor is the signature shinobi set in Ghost of Yōtei, sleek, silent, and engineered for precision. Focused on Quickfire weapon mastery (like Kunai and Smoke Bombs), it enhances stealth kills and status effects while keeping Atsu nearly invisible in the field. If you like playing the unseen assassin with a dash of chaos, this armor’s for you.
How to Get the Nine Tail Armor:
You’ll earn this set by completing the Revenge quest “Blood on the Snow” in the Teshio Ridge region.
Begin the quest at the Red Crane Inn, which serves as your entry point into the Teshio storyline.
Completing the mission rewards you with the Nine Tail Armor automatically.
Upgrade Method: The Nine Tail Armor upgrades through Ginji the Armorer, requiring Coin, Textiles, and Shinobi Steel. Each tier deepens your stealth capabilities and improves how Quickfire weapons interact with enemies, boosting both damage and duration of inflicted effects.
Level | Cost | Perk Improvements |
II | 650 Coin | Quickfire weapon damage and status effect duration increased by a moderate amount. |
III | 1,100 Coin + 10 Textiles + 30 Shinobi Steel | Assassinations have a chance to grant two Quickfire ammo. |
IV | 2,000 Coin + 20 Textiles + 10 Rare Metals | Enemy detection speed and assassination noises further reduced. |
Core Perks:
Perk | Effect |
Quickfire Mastery | Boosts Quickfire weapon damage and status duration. |
Silent Executioner | Assassinating enemies has a chance to replenish Quickfire ammo. |
Shinobi’s Veil | Reduces enemy detection speed and noise during assassinations. |
Pro Tip: Pair the Nine Tail Armor with Smoke Bombs and Blind Bombs for maximum synergy — status effects last longer, and replenished ammo keeps your stealth loop going indefinitely.
Fundoshi: How to Get It & Perk Guide
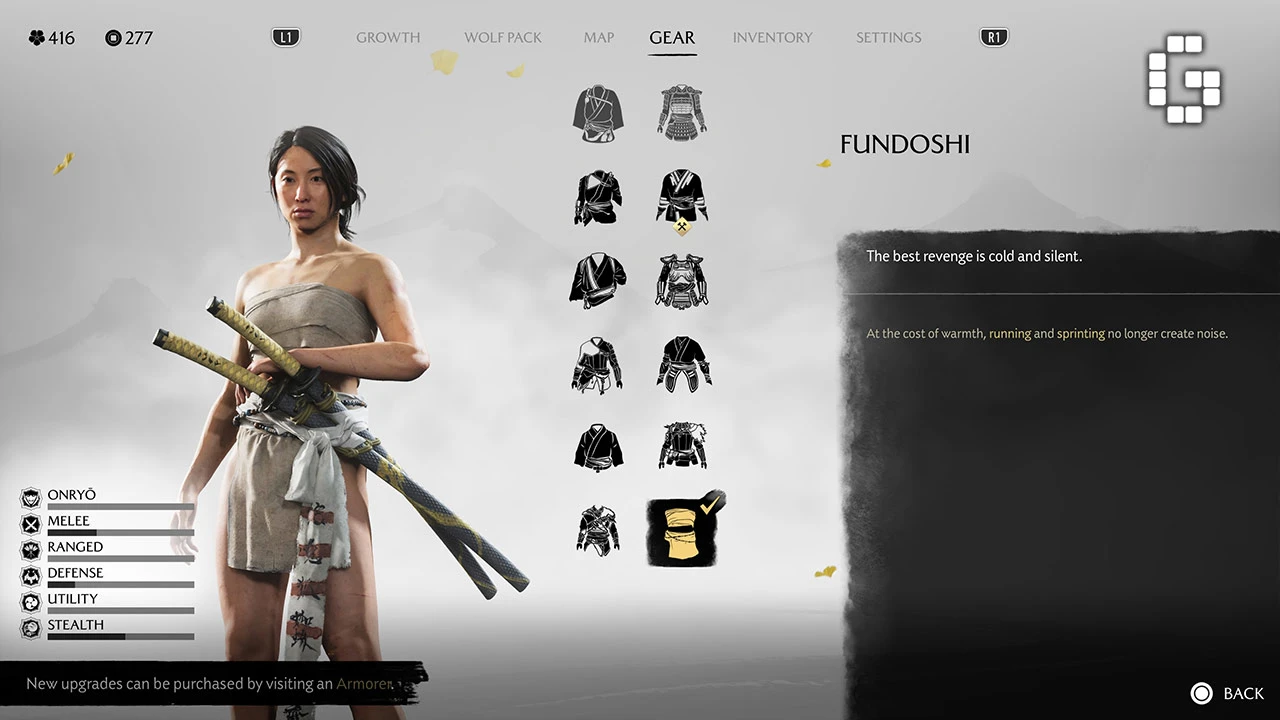
Every stealth game has that reward for the true completionists and in Ghost of Yōtei, it’s the Fundoshi. Equal parts ridiculous and powerful, this “armor” is literally just Atsu in a loincloth, trading fashion for function. Despite the look, it’s a legitimate stealth set thanks to its one surprisingly strong perk: completely silent movement.
How to Get the Fundoshi:
You’ll unlock the Fundoshi by bathing in all 16 Hot Springs scattered across Ezo.
Each Hot Spring is marked by rising steam and red trees on elevated cliffs.
You can use the Song of Well-Being on your Shamisen to guide the wind toward the nearest spring.
After visiting the final one, you’ll automatically receive the Fundoshi — completing your armor collection and qualifying for the For All Occasions trophy.
Upgrade Method: The Fundoshi cannot be upgraded, what you see is what you get (literally). But its single perk makes it one of the most effective stealth tools for pure infiltration runs.
Core Perk:
Perk | Effect |
Perfect Silence | Running and sprinting make no noise, making this the best outfit for stealth challenges or silent takedown runs. |
Pro Tip: Pair the Fundoshi with Crimson Kimono charms or Quickfire weapons for maximum silent efficiency. It’s ridiculous, sure, but running through a fortress half-naked while no one hears you is pretty hilarious and ghost-like.
Armor That Shapes a Legend
From the cursed Armor of the Undying to the humble-but-iconic Fundoshi, every armor set in Ghost of Yōtei tells its own story and mastering them all turns Atsu from a survivor into a legend.
No matter your path, remember this: every Revenge Tale, Mythic quest, and collectible ties back to how you wear your strength. So mix your loadouts, dye those sets, and carve your legacy across Ezo, one perfectly timed parry (or stealthy Fundoshi sprint) at a time.

Wordsmith at SteelSeries. Enthusiastic about Dota 2 and fighting games. A cat dad.